Hay Day Derby Guides/Tips
Below are some general guides and information to help complete derby tasks in a more efficeint way
regardless of your farm level.
Use the nav above to jump to an area.
General farm prep before derby
The following things can be really useful to do prior to derby start. All very simple even for those of lower levels.Just to note with town, it's always best that your ready visitors are not single serve. That way they will be there for a fellow neighbour to come and collect
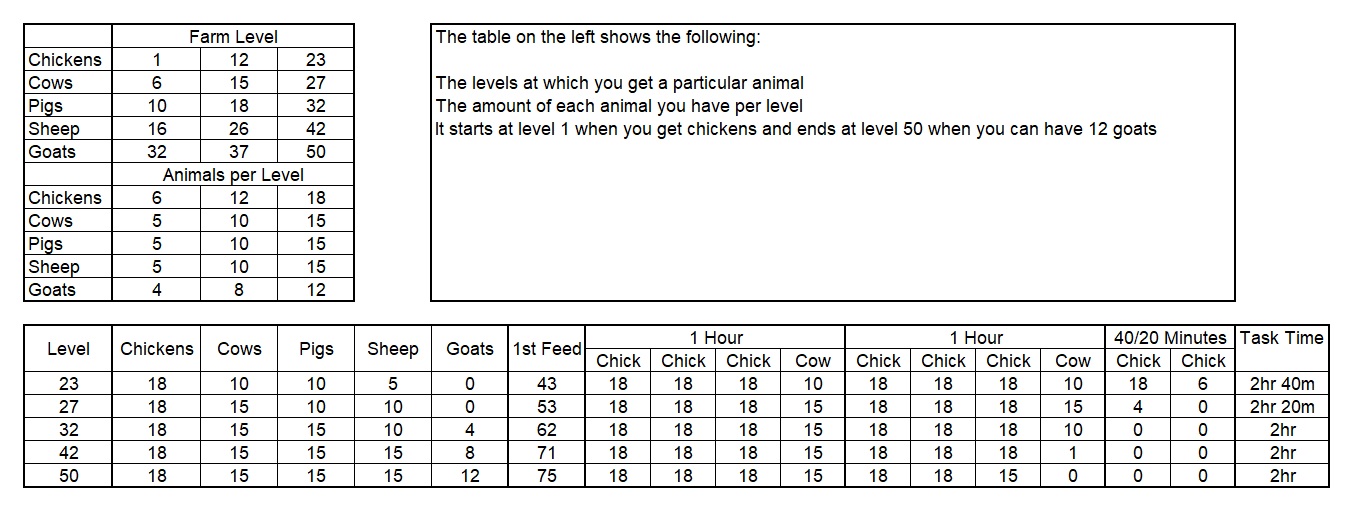
Feeding Animals
As a task, feeding animals is really simple and a good task to take, even for those of lower levels.
Below is best practice for a feeding task and a guide as to the minimum time to complete a feed task
depending on your farm level.
Essentials All your animals are fed and ready collect. You have enough feed made for 1 round of collect and feed of all animals even if you don't have all of them yet. One more really good thing to have is at least 4 slots in both of the feed mills.
Tip for doing it quickly You take the task and then go round and collect and feed all of the animals you have. Then (assuming you have at least 4 spots in each mill) start to make 6 x chicken feed and 2 x cow feed, put evenly is key too, so 3 x chicken and 1 x cow in each mill. As chickens take 20 minutes between feeds there is enough to make all the chicken feed plus the cow feed. Keep doing the same and at evey 3rd feed of chickens you can also do all of your cows too because they take an hour. Then basically keep going as above until the task is completed.
The task is feed 195 animals
So based upon level the task time will vary slightly, these are absolute minimum times to complete the task.
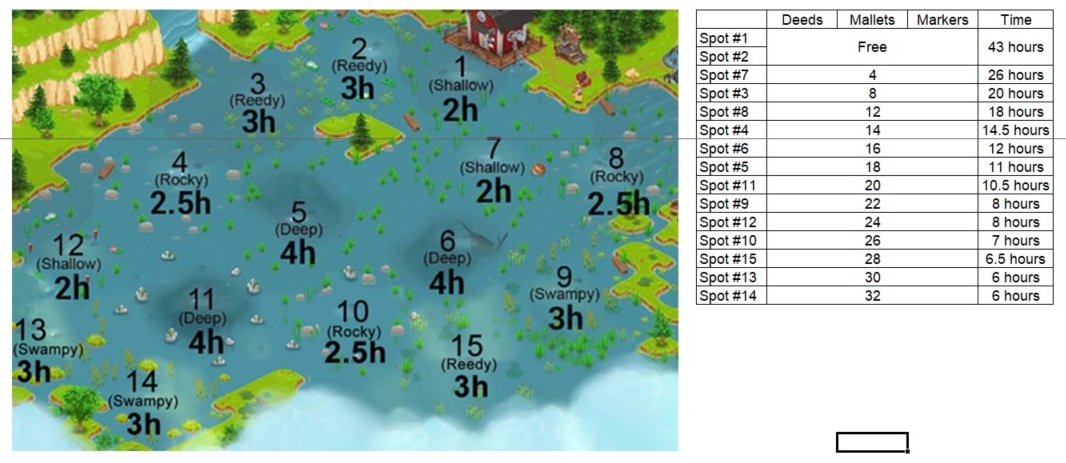
Fishing
As fishing is such a regular derby task I thought I would give a simple guide as to how long the task will take you to complete, really important for those that don't have all of the spots open yet.
Below is a map of the fishing area and the time each spot takes to reset after a fish is caught.
The table on the right gives all of the fishing spots listed in the most logical order in which they would be opened (based upon smallest amount of EM's)and the amount of items required to open the spot. The last column in the table will will show you how long the task will take you, a few assumptions are made for this. It based upon an average of 34 fish to complete a 110lb task, all the available spots can be fished straight away and no breaks in between, unlikely so these are absolute minimum times.
The other really important thing this will tell you is that you MUST have at least 34 lures ready but would advise 40 and ideally the lure machine would be stacked to its maximum.
Leaderboard
For some who are in the champions league you may wonder how leaderboard points work, well here you are, a short explanation and example.
The leader board points are calculated based upon the 4 following areas:
Example:
Points 3296.61 = 3200+10+91-4.39
The final points shown on the leader board are a sum of the last 4 rolling weeks

Stacking Farm
Stacking machines with all items for a derby task can greatly speed up your derby, the hardest thing is know exactly what machines to stack and with what. I will get on
to that elsewhere.
For those who have never done stacking it can be quite difficult and mistakes are easily made. Below is a short explanation of how to stack machines.Important things to remember,
If you want to practice then stack items such as apple juice because they don't take anything from your barn. The short video below shows how it's done.
For stacking my personal preference is baskets and then make the extra to cover a single production task with the basket type being based on statistical data from many weeks of derbies.
For example, the Spa task which comprises of Goat Cheese x 9, Olive oil x 9 & Strawberry candles x 6. So I would also make all of those items up to be single production tasks too, especially Strawberry Candles as that is a popular task.
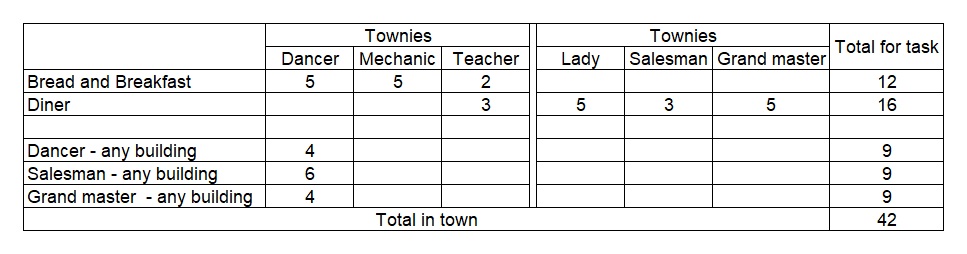
Stacking Town
Firsty a small bit about the importance of town, on average town related tasks make up near 30% of a total derby task type and secondly town is
so much better to do than boats for the following reasons,So for the above reasons doing boats over town make no sense at all.
Stacking the town can be very simple, just choose visitor type or building type or a combination of visitor and building and also think about the basket Townies tasks too. The table below gives an idea of what can be done with combinations to cover as many tasks as possible and will prep you for 8 of the following tasks,
This is based on a fully upgraded town but can be adjusted depending on your town level
These are also good ones to choose as Bed & Breakfast, Grand Master & Salesman are generally the most regular each derby
Machines
Below is a full list of all machine by level with the cost of each machine. As you would expect, always plan to have
the minumum amount of coins for the machine at level up because playing catch up is really difficult. This has been made
worse with the introduction of Farm Pass where if done you generally level up faster.
Enter your farm level and it will show all the next machines you need.
| Enter Level: |
| Level | Machine | Cost |
|---|---|---|
| 7 | Sugar Mill | 350 |
| 8 | Popcorn Pot | 650 |
| 9 | BBQ Grill | 730 |
| 14 | Pie Oven | 2,200 |
| 17 | Loom | 3,200 |
| 19 | Sewing Machine | 4,500 |
| 21 | Cake Oven | 12,100 |
| 24 | Smelters x 1 | 12,500 |
| 24 | Smelters x 2 | 22,000 |
| 24 | Smelters x 3 | 31,500 |
| 24 | Smelters x 4 | 41,000 |
| 24 | Smelters x 5 | 50,500 |
| 26 | Juice Press | 31,000 |
| 29 | Ice Cream Maker | 38,000 |
| 30 | Net Maker | 28,000 |
| 35 | Jam Maker | 59,000 |
| 38 | Jeweler | 68,000 |
| 39 | Honey Extractor | 35,000 |
| 42 | Coffee Kiosk | 75,000 |
| 44 | Lobster Pool | 80,000 |
| 46 | Soup Kitchen | 115,000 |
| 48 | Candle Maker | 118,000 |
| 49 | Flower Shop | 120,000 |
| 50 | Duck Salon | 90,000 |
| 51 | Candy Machine | 120,000 |
| 54 | Sauce Maker | 135,000 |
| 56 | Sushi Bar | 150,000 |
| 58 | Salad Bar | 165,000 |
| 61 | Sandwich Bar | 180,000 |
| 64 | Smoothie Maker | 220,000 |
| 67 | Pasta Maker | 400,000 |
| 69 | Wok Kitchen | 350,000 |
| 70 | Hat Maker | 260,000 |
| 72 | Pasta Kitchen | 550,000 |
| 75 | Hotdog Stand | 650,000 |
| 76 | Donut Maker | 680,000 |
| 76 | Sugar Mill | 200,000 |
| 77 | Taco Kitchen | 700,000 |
| 80 | Tea Stand | 750,000 |
| 81 | Fondue Pot | 800,000 |
| 84 | Bath Kiosk | 850,000 |
| 87 | Deep Fryer | 900,000 |
| 91 | Preservation Station | 950,000 |
| 94 | Pottery Studio | 1,000,000 |
| 99 | Fudge Shop | 1,050,000 |
| 103 | Yoghurt Maker | 1,100,000 |
| 106 | Stew Pot | 1,150,000 |
| 109 | Cupcake Maker | 1,200,000 |
Animals
The table below gives the cost of animals at and when you reach the level to add more.
| Level | Item | Cost | Overall Cost |
|---|
| 6 | 1st Cow Pasture | 20 | 270 |
| Cows x 5 | 250 | ||
| 10 | Pig Pen | 150 | 2650 |
| Pigs x 5 | 2500 | ||
| 12 | 2nd Chicken Coup | 5 | 845 |
| Chickens x 6 | 840 | ||
| 15 | 2nd Cow Pasture | 20 | 3020 |
| Cows x 5 | 3000 | ||
| 16 | 1st Sheep Pasture | 300 | 4300 |
| Sheep x 5 | 4000 | ||
| 18 | 2nd Pig Pen | 150 | 7150 |
| Pigs x 5 | 7000 | ||
| 26 | 2nd Sheep Pastue | 300 | 11800 |
| Sheep x 5 | 11500 | ||
| 27 | 3rd Cow Pastue | 50 | 5800 |
| Cows x 5 | 5750 | ||
| 32 | 1st Goat Yard | 1000 | 21250 |
| Goats x 4 | 8600 | ||
| 3rd Pig Pen | 150 | ||
| Pigs x 5 | 11500 | ||
| 37 | 2nd Goat Yard | 1000 | 22600 |
| Goats x 4 | 21600 | ||
| 42 | 3rd Sheep Pasture | 300 | 19300 |
| Sheep x 5 | 19000 | ||
| 50 | 3rd Goat Yard | 1000 | 35600 |
| Goats x 4 | 34600 |
Animals + Other
At certain levels there is also a new machine available along with more animals.
The table below shows the combined cost at each level up.
| Level | Item | Cost | Overall Cost |
|---|
| 26 | Juice Press | 31000 | 42800 |
| 2nd Sheep Pastue | 300 | ||
| Sheep x 5 | 11500 | ||
| 42 | Coffee Kiosk | 75000 | 94300 |
| 3rd Sheep Pasture | 300 | ||
| Sheep x 5 | 19000 | ||
| 50 | Duck Salon | 90000 | 125600 |
| 3rd Goat Yard | 1000 | ||
| Goats x 4 | 34600 |
Trees
Below is a full list of all the trees showing harvest amounts, cost and profit per tree etc.
| Tree | Level | Cost | Time/hrs | Stage 1 | Stage 2 | Stage 3 | Stage 4 | Coins/item | Tree Profit | |
|---|---|---|---|---|---|---|---|---|---|---|
| Apple | 15 | 160 | 16 | 2 | 3 | 4 | 4 | 39 | 347 | |
| Cherry | 22 | 410 | 27 | 2 | 3 | 4 | 4 | 68 | 474 | |
| Cacao | 35 | 550 | 34 | 2 | 3 | 4 | 4 | 86 | 568 | |
| Olive | 57 | 620 | 24 | 2 | 3 | 4 | 4 | 82 | 446 | |
| Lemon | 66 | 670 | 28 | 2 | 3 | 4 | 4 | 93 | 539 | |
| Orange | 71 | 720 | 31 | 2 | 3 | 4 | 4 | 97 | 541 | |
| Peach | 76 | 750 | 30 | 2 | 3 | 4 | 4 | 100 | 550 | |
| Banana | 88 | 800 | 28 | 2 | 3 | 4 | 4 | 104 | 552 | |
| Plum | 94 | 600 | 25 | 2 | 3 | 4 | 4 | 82 | 466 | |
| Mango | 97 | 770 | 32 | 2 | 3 | 4 | 4 | 100 | 530 | |
| Coconut | 101 | 810 | 36 | 2 | 3 | 4 | 4 | 108 | 594 |